Tuesday, 19 May 2015

Salesforce Object Search Language


When you want to find records for more than one Object based on search string that you specify is called SOSL.

We are passing the entire SOSL expression in “StringsearchExpr” parameter of the search() call.

SOSL does not search the following object and fields

  1. Any elements such as picklist that are defined as not searchable()
  2. Number,date or checkbox fields. (Use SOQL to search this fields)
  3. Textarea fields, unless you use the ALL FIELDS in search group.
  4. Attachment records associated with Account, contact or opportunity.

Example Query 


In Apex:

FIND ‘keyword*’ IN ALL FIELDS RETURNING Account (Id, Name), Contact, Opportunity, Lead

In Force.com API

FIND {keyword*} IN ALL FIELDS RETURNING Account (Id, Name), Contact, Opportunity, Lead
 
Find Keyword
  • You can search a single word or a phrase.
  • You can use “ ”,AND,OR,AND NOT,().
  • Reserved Character:
? & | ! { } [ ] ( ) ^ ~ * : \ " ' + -  
            If we are using the above characters, then we should use backslash \ character (escape sequence).

IN Search group: 


This is optional clause, which allows you to define the type of fields to search.
ALL FIELDS
EMAIL FIELDS
NAME FIELDS
PHONE FIELDS
SIDEBAR FIELDS


Returning:


Syntax:
Returning ObjectTypeName [(Fieldlist [where ConditionExpression] [order BY Clause] [LIMIT n])][ ,ObjectTypeName[(FieldList) [where ConditionExpression] [Order BY clause] [Limit n])] ]

Object Type Name
Object to return.
Field List
Optional One or more field from the object
Where Condition
Optional, Specify the filter for the particular object
Order By Clause
Optional, Arrange the given values in asc and desc for the specified object.
Limit n
Optional, Number of rows the query should return for the specified object.

With Division :


The division should be enabled for the organization, in order to use this syntax. It will act similar to where condition. But if we use division keyword, below are the advantages.

  • It pre-filters all records based on division before applying other filters.
  • You can specify the division’s name in the filter, rather than its ID( as is required if you filter on division in the WHERE clause)

To Label:


Syntax:

toLabel(Object.field)

FIND ‘string*’ RETURNING Account(Name, toLabel(Recordtype.Name))

This query returns Account records with the record type name translated into the language for the user who issued the query.

We cannot filter on the translated name value of the record type. Always filter on the master values or the ID of the object for record types.

Friday, 17 April 2015

Remove From Address on "Send an Email" Page

Sometimes we can able to see 2 same email address in Send an email Page. Like below image.

"From" list will show all the emails from

            1. Email to Case
            2. Organization-Wide Addresses.

If you don't want to display the emails in "From" list, then we have to remove the address from Organization-Wide Addresses.

Setup -> administer -> Email Administration -> Organization-Wide Addresses. 

Remove the address from here.

This will help us to maintain the "From" list in a clean way.

Monday, 13 April 2015

How to setup Live Agent


For setting up live agent, we need to have license for live agent. In Developer Edition, we have 2 licenses.

Step 1 :


We need to enable the Live Agent.


Now, we can able to see the below list of setting in salesforce.


Step 2: Skills


Skills are used to track agent’s areas of expertise and to make sure that chats are routed to agents with the required skills. 


We need to give the name and we have to select the User, who has the correct skills and select the User and also we can select the profile. If we want to include some user of the particular Profile then we can use "Select User" option and if we want to use the profile that all the user going to use live agent then we can go profiles. Click Save button.

Step 3: Chat Buttons and Automated Invitations


we are going to configure the chat button and automated invitations, how customer can interact with the Live agent.


we can configure the behavior of the live chat notification and how the request should reach the Agent.


Second part is the site configuration, it is not necessary unless you need to have a pre-chat form or we need to setup the live chat button in Force.com sites. We can take a look when we have to configure the pre-chat form. Click on save.

Once Chat button is saved, you can see the HTML code of the button.

Step 4 :  Live Agent Configuration


Here we have 5 sections. First we can see about "Basic Configuration". 


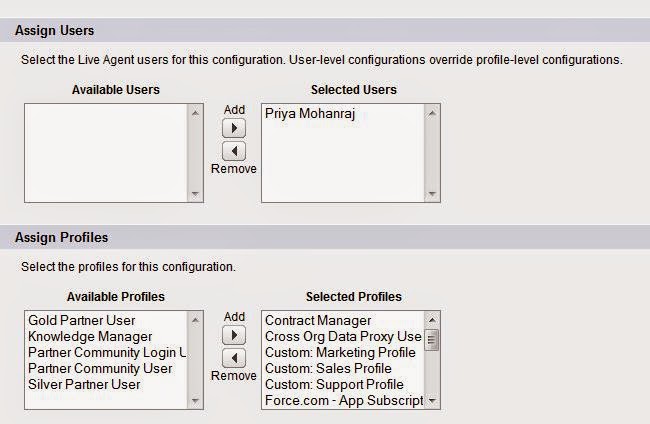
Next section is like Assign User and Assign Profiles.


So if you want the particular profile needs to be selected (means all the user under the profile going to use Live agent) else we can select individual user.

Next section is Supervisor Section


In this section, we are going to configure the supervisor for the Agent. So supervisor can send private message to Agent while they are in chat and also they can see what the Agent is typing with the customer.

The Last section is Chat Transfer.


So In this section we can transfer the chat to another Agent. This will help the Agents, if they are not able to answer for the particular queries.

Step 5: Live Agent Deployment


Once it is saved. It contains some HTML code. 

Step 6:


Copy the HTML code from Deployment and also from chat button setting. create one Html Page and put the script into the HTML Page.


Step 7: 


Enable the Live Agent License into the User.


To Make the Live Agent visible to the Agents, we have to setup Service Cloud console. For that you can see this link.

http://priyamohanraj.blogspot.in/2015/04/setup-service-cloud-console.html


Setup Service Cloud Console


Service Cloud Console is very useful for Customer support team, They can able to handle the knowledge, Phone, liveagent and cases in the same window.

To setup the service cloud console:

Goto setup -> Create - > Apps -> Click on New Button


Choose the Console in the list and click Next.


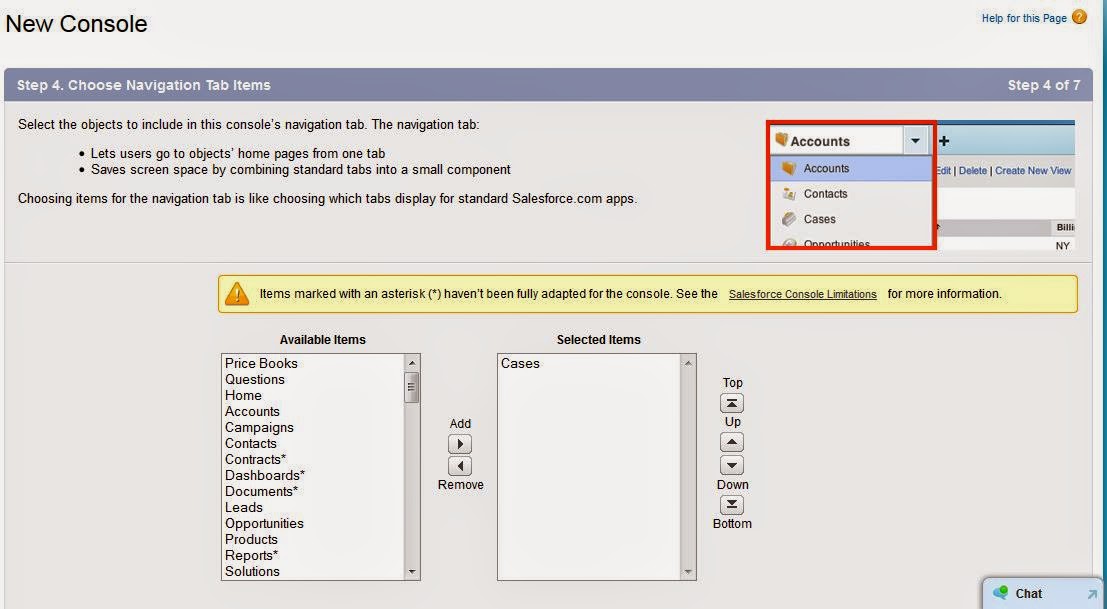
Give the Name of the console and then click next. If you want to insert the company logo you can, then click next.Choose the Navigation Tabs.


If you need any tabs, that CSS team needs to be navigate then we can selects the tabs, to display on the drop down list.


 Sub- Tab 


Sub-tab is used to display at the top of the record detail page. In this case, I have choose the Contact name. when you seeing the record the contact name will be displayed on the top the record like below.


Live Agent and Knowledge:


In this section, we can include the live agent and knowledge into the console. If we want to create new record during the chat,we can choose which records needs to be created.

Then is the profile visibility of the console.


Then click on save.

Now you can see the "Service Cloud Console" on the App list.


And the window will look like below.


Tuesday, 3 February 2015

JSON Deserialize


If Rest API returns the JSON string, below is the JSON String (array of data). if you have square bracket in your JSON then it is returning the array of the data.

String jsonString = '[ {
 "FirstName" : "test",
 "LastName" : "data1",
 "Email" : "test.data1@email.com",
 "Title" : "Mr"
 },
 {
 "FirstName" : "test",
 "LastName" : "data2",
 "Email" : "test.data2@email.com",
 "Title" : "Miss"
 },
 {
 "FirstName" : "test",
 "LastName" : "data3",
 "Email" : "test.data3@email.com",
 "Title" : "Mr"
 },
 {
  "FirstName" : "test",
 "LastName" : "data4",
 "Email" : "test.data4@email.com",
 "Title" : "Miss"
 },
 {
 "FirstName" : "test",
 "LastName" : "data5",
 "Email" : "test.data5@email.com",
 "Title" : "Mr"
 } ] ';

we have to create wrapper class to get or store the values from API.

Wrapper class :
global class wrapperclass_For_API
 {
        public string Firstname{get;set;} // case sensitive we have to give the name as there in JSON.
        public string Lastname{get;set;}
        public string Email{get;set;}
        public string Title{get;set;}       
}

In Apex class the below code can be used to get the JSON without parsing.

 List<wrapperclass_For_API> rs = (List<wrapperclass_For_API>)System.JSON.deserialize(jsonString, List<wrapperclass_For_API>.class);
List<wrapperclass_For_API> wrapperlist = new List<wrapperclass_For_API>();
// If we want to get the data, we can directly get the data from rs variable like below.
for(wrapperclass_For_API s : rs)
{
       wrapperclass_For_API wfa = new wrapperclass_For_API();
       wfa.Firstname = s.Firstname;
       wfa.Lastname = s.Lastname;
       wfa.Email = s.Emaill;
       wfa.Title = s.Title;
       wrapperlist.add(wfa);
}
// after that we can access the values through wrapper list.

If JSON string is not an array, it returns only single user data based on email Id as below

string JSON_string = {
  "FirstName" : "test",
 "LastName" : "data5",
 "Email" : "test.data5@email.com",
 "Title" : "Mr"
}

   Map<String, Object> m = (Map<String, Object>) JSON.deserializeUntyped(JSON_string);
   Object First_Name = (Object) m.get('FristName'); 
   system.debug('**********'+First_Name); // it returns "test"(value of the first name) in the log.
  

Sort Map in Apex Class


Convert the map in to list, to sort the map in salesforce. Below is the example for that.

public class sortmap{

public void mapsort()

{

      map<Integer,string> sortm = new map<Integer,string>();

      List<Integer> sortlist = new List<Integer>();

      sortm.put(10,'E');

      sortm.put(89,'F');

      sortm.put(1,'T');

      sortm.put(2,'Y');

      sortm.put(90,'R');

      system.debug('----------------'+sortm);

      // To sort this map

      sortlist.addall(sortm.keyset());

      sortlist.sort();

      for(Integer i : sortlist)

      {

                  system.debug('Sorting the Map in salesforce'+sortm.get(i));

       }

}
}

Thursday, 4 December 2014

How to limit the scope in batch class

While executing the batch, you can limit the scope of the batch class.

Example:

Below is the sample batch class

Batch Class:

global class BatchClass implements  Database.Batchable<Sobject>
{
                global Database.QueryLocator start(Database.BatchableContext BC){
                }
                global void execute(Database.BatchableContext BC, List<case> scope){
                }
                global void finish(Database.BatchableContext BC){
                }
}

While calling the batch class in another class

BatchClass exter = new BatchClass();
database.executebatch(exter,1);

In the execute method , we can give the parameter to limit the scope.