Monday, 2 November 2020

Mass Case Close button in Salesforce Lightning

 Mass close button is available only in salesforce classic. currently its not available in lightning.

To add the Mass close button in salesforce lightning list view, below are the steps 

1. Go to Setup and click on Object Manager.

2. Click on Buttons,links and Action in case object and click on "New Action"


3. Choose Action type as "Update a Record ", add Label, Name and success Message.

4. Click Save. It will take you to the pagelayout. Add the necessary field in the layout like below. I have added only 2 fields.


5. Click save and add the action to the list view. Under Case -> Search Layout for classic -> Click Edit on the list view layout.


6. Under   List View Action in Lightning Experience add the close button like below.


7. The button will be displayed in the list view. Choose  the multiple record and click on the "Close Case" button, it will appear as below.

Note: This button will not be visible in "Recently Viewed" list view.


8. Click Save. All the selected records are updated as closed.


Thursday, 29 October 2020

Update the Attachment Filename of Article in salesforce Knowledge.

 If you want the Attachment file name to be updated in the articles. below are the list of steps:

Step1 : If the articles are published you have to create a draft articles for each published article manually.

Step2 : If the articles are draft, then you can use the draft articles.

Step3: Using the draft Article Id and new file name of the articles in the CSV file, you can use the dataloader to update the Attachment file name of the Article type.

NOTE: Using dataloader you can't update the publish status of the Articles.


Monday, 29 July 2019

Issue : Activity History 'Type' field Defaults to 'Call' when we send an email.

Solution:

In the setting when you look into task fields --> Type --> click edit link in 'email' and check the "Send Email Default" box.


Friday, 5 August 2016

Salesforce Header and Sidebar is not displaying in visualforce Page

To resolve this issue, if you see inline=1 in the URL of the visualforce page, then that is the reason for the header and sidebar is not displayed.

To  resolve this issue, please use this below script in the visualforce page to display the sidebar and header.

<script>

if (location.href.match(/inline=1/)) window.top.location=location.href.replace(/inline=1/, '');
</script>

Monday, 1 August 2016

Add LiveChat User Information into Live Chat Transcript Object using Deployment API

As we all know we can get the custom detail of the users/visitors who clicks the live chat icon in the website. In salesforce the details of the users/visitors will be available for the Agent in the visitor detail page but, when you are trying to pull the reports for that data which resides in the Visitor detail page, it is not possible.

If we want those data for reporting we need to do some code change in the website page as well as we need to create some fields in the Live Agent Transcript Object.

Here is the code,

<html>

<script type='text/javascript' src='https://c.la3-c1cs-was.salesforceliveagent.com/content/g/js/36.0/deployment.js'></script>
<script type='text/javascript'>
liveagent.init('https://d.la3-c1cs-was.salesforceliveagent.com/chat', 'XXXXXXXXXXXXX', 'XXXXXXXXXXXXXXX');
liveagent.addCustomDetail("9.First Name", "Priya").saveToTranscript("First_Name__c");
liveagent.addCustomDetail("8.Last Name", "Mohanraj").saveToTranscript("Last_Name__c");
liveagent.addCustomDetail("7.Email", "priyamohanraj754@gmail.com").saveToTranscript("Email__c");
liveagent.addCustomDetail("4.Display Name", "Priya").saveToTranscript("Display_Name__c");
liveagent.addCustomDetail("3.User Name", "priya").saveToTranscript("User_Name__c");
liveagent.addCustomDetail('5.Language', 'English').saveToTranscript("Language__c");
liveagent.addCustomDetail('6.Country', 'India').saveToTranscript("Country__c");
liveagent.addCustomDetail('1.User ID', '1234').saveToTranscript("User_ID__c");
liveagent.addCustomDetail('2.Full Name', 'Priya Mohanraj').saveToTranscript("Full_Name__c");

</script>
<img id="liveagent_button_online_XXXXXXXXXXXXXXXX" style="display: none; border: 0px none; cursor: pointer" onclick="liveagent.startChat('XXXXXXXXXXXXXXX')" src="https://english.na2.force.com/liveagentbutton/resource/XXXXXXXXXXXXXXX/livechatbtnonline" />
<img id="liveagent_button_offline_XXXXXXXXXXXXXXX" style="display: none; border: 0px none; " src="https://english.na2.force.com/liveagentbutton/resource/XXXXXXXXXXXXXXXX/livechatbtnoffline" />
<script type="text/javascript">
if (!window._laq) { window._laq = []; }
window._laq.push(function(){liveagent.showWhenOnline('XXXXXXXXXXXXX', document.getElementById('liveagent_button_online_XXXXXXXXXXXXXXX'));
liveagent.showWhenOffline('XXXXXXXXXXXXXXXX', document.getElementById('liveagent_button_offline_XXXXXXXXXXXXXXX'));
});</script>

</html>

In the above code saveToTranscript is doing the magic. If we give this method along with the custom detail then, it will save the data in the Transcript object in the mentioned field. The fields which are mentioned inside of the SaveToTranscript method is a custom fields which we needs to be created in the LiveAgent Transcirpt object in salesforce.

Thanks

Happy Coding!!!

Friday, 29 July 2016

On Click on apex:outputText Tag.


Lets see how to use onclick on the <apex:outputText> Tag.

Its very simple, but it took 3 hours to find the solution for it.

Here you go,

Its just a simple code on Account Object.

VF Page

<apex:page standardController="Account" extensions="outputfielddblclick_extn" id="pg1">
<apex:form id="frm1" >
<apex:pageBlock id="pb1">
<apex:pageBlockSection id="pbs1" >
<apex:outputpanel id="counter">
<table>
 <tr>
<td> <apex:outputText value="Account Name"></apex:outputText> </td>
<td> </td> <td> </td> <td> </td> <td> </td> <td> </td> <td> </td>                 
<td> <apex:outputText value="{!Account.Name}"/>
<apex:actionSupport event="ondblclick" action="{!justdisplay}" rerender="counter" status="s1"/>        <!-- Status is not a mandatory -->
</td>
</tr>
</table>
</apex:outputpanel> 
<apex:actionStatus id="s1"> <!-- This status is used in the actionSupport. Its not mandatory -->
<apex:facet name="start">
loading....
</apex:facet>
</apex:actionStatus>
</apex:pageBlockSection>
</apex:pageBlock>
</apex:form>
</apex:page>

Below is the apex class,

public class outputfielddblclick_extn {

    public outputfielddblclick_extn(ApexPages.StandardController controller) {

    }
    public void justdisplay()
    {
        system.debug('RRRRRRRRInside FunctionRRRRRRRR');
        // your logic here
    }
}

If you double click on the Account Name, it will call the "justdisplay()" method in the class.

Below is the output screen.


It will work on apex:outputfield also.

Happy Coding!!!

Tuesday, 8 December 2015

Automate the Approval Process

We can use process builder  and trigger to automate the Approval Process in salesforce.

Now we are going to see, how process builder is used for automation.

First we need to create the Approval Process in Salesforce.

Approval Process:


Choose the Object, you want to create the Approval Process.

For creating the Process Builder, I have used "Jump Start Wizard"  in Approval Process.


Then the below page will get displayed.

Here I have given the

Name for the Approval Process.
Given the criteria as Type = "Customer-Direct , Customer-Channel"
Approver as Manager.

 
Click Save. The below page will appear.


Click on "View Approval Process Detail Page". The below page will get displayed.


I have a custom field called "Approval Status field". It contains the "Submitted,Approved,Rejected,Recalled" values.

In the Initial Submission Actions Section,  click on Add New -> Field Update. The below page will get displayed.

I have given the

1. Name
2. choose the Approval Status Field.
3. Choose the "Submitted" value in the "A specific Value" Field.

Click on save.

Do the similar steps for "Final Approval Action" and "Final Rejection Action".

For Approval Action give "Approved".
For Final Rejection Action give "Rejected".

Then Activate the Approval Process. It looks like below.


Process Builder


From setup Click on "Process Builder" under "Create". click New Button. below screen will appear. Give the Name and Description. Click Save.

 
The below screen will appear.

Click on "Add Object". Choose the "Account" object and you can choose either "only when record is created" or "when a record is created or edited". Here I have choose "Only when record is created".
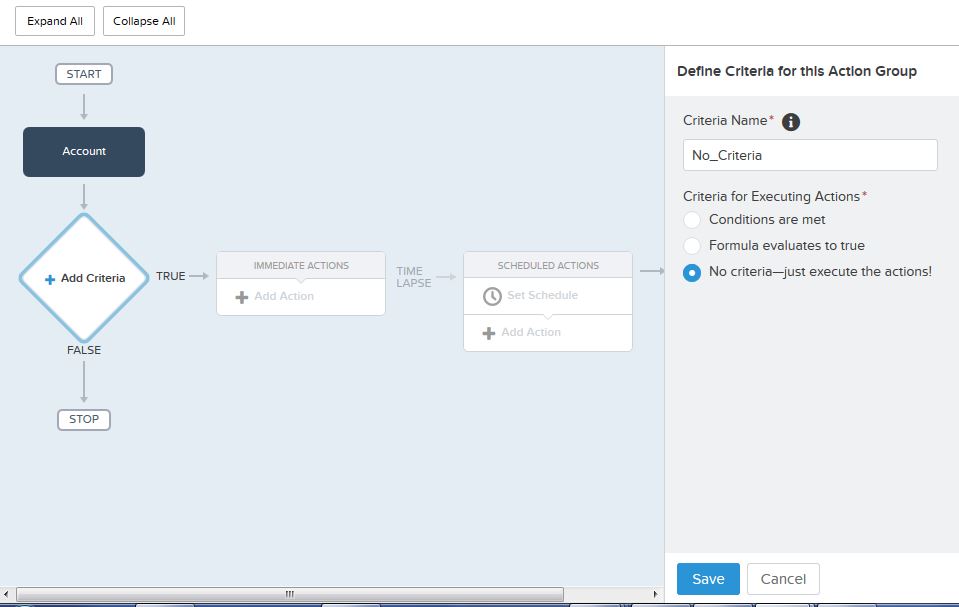
 Now we to give criteria, Inorder to execute the Process Builder. Here I have given "No Criteria - Just execute".


Now we have to define the Action. Click on "Add Action" link in the Process builder and choose action type "Submit for Approval". Give the Action Name, Choose the Approval Process that you have created. choose the submitter as "Current User" and click Save.

If you want to schedule, you can schedule the Actions. this is similar to Time trigger workflow.

Now Activate the Process Builder.

Note: Once process Builder is activated. we cant edit the Process Builder. In order to edit, we have to clone the Process builder.


So when ever Account record is created, it will automatically submit the record for Approval. No need of custom code to automate this.